.svg)


Aplicaciones en este flujo de trabajo


Cómo funciona
Mejora la funcionalidad de tu sitio web WordPress integrando perfectamente el plugin WP Webhooks con Latenode. Esta integración ofrece una solución a un problema común: la necesidad de una automatización eficaz en la gestión de los datos de WordPress y las interacciones con servicios externos.
Antes de integrar WP Webhooks con Latenode, la gestión de los flujos de trabajo de automatización solía implicar procesos manuales o desarrollo personalizado. Esto solía dar lugar a ineficiencias, mayor carga de trabajo y posibles errores.
Con la integración de WordPress Webhooks y Latenode , ahora puedes automatizar varias tareas, como enviar datos de WordPress a servicios externos o activar acciones en WordPress basadas en eventos externos. Por ejemplo, puedes actualizar automáticamente los registros de clientes en tu CRM cuando un nuevo usuario se registre en tu sitio de WordPress, o puedes activar notificaciones por correo electrónico a los usuarios cuando se cumplan determinadas condiciones.
Esta integración permite a los propietarios y desarrolladores de sitios web agilizar sus flujos de trabajo, reducir la intervención manual y garantizar una comunicación fluida entre WordPress y los servicios externos. Al simplificar la gestión de contenidos y permitir interacciones fluidas, esta solución mejora la participación de los usuarios y el rendimiento general del sitio web.
Qué necesitarás:
- Sitio web WordPress
- Plugin de webhooks para WordPress
- Latenode cuenta
Paso 1: Instalar el plugin WP Webhooks
- Descarga el Plugin:

- Visita la página de webhooks de wordpress y descarga el plugin como archivo zip.
Instalación:
- Ve a la página de gestión de plugins de tu sitio web WordPress.
- Ve a Mi sitio > Plugins > Añadir nuevo plugin > Cargar.
- Sube el archivo zip descargado e instala el plugin.
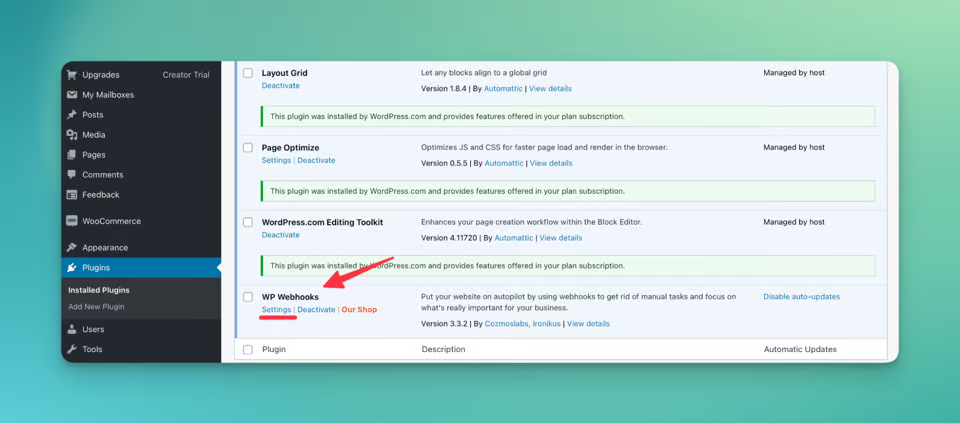
Activación:
- Una vez instalado, localiza wordpress webhooks en la pestaña de tu plugin.
- Haz clic en Configuración para empezar a configurar el plugin.
Paso 2: Visión general de la configuración
Enviar datos:

- Configura activadores para flujos de trabajo de automatización.
- Selecciona los eventos que desencadenarán la ejecución de las tareas de automatización.
Recibir datos:

- Obtener la URL de las Acciones Webhooks con una clave API.
- Define las acciones que deben realizarse al recibir datos de fuentes externas.
Paso 3: Automatizar tu sitio web
- Diseña tu escenario:

- Define el escenario de automatización que deseas implantar.
- Por ejemplo, recopilando los comentarios de los usuarios y almacenándolos en Hojas de cálculo de Google.
Configuración del escenario:
- Crea un nuevo escenario en Latenode.com
- Cambia el nombre de tu escenario para identificarlo fácilmente.
Configuración del Activador Webhook:
- Añade un nodo desencadenante webhook a tu escenario.
- Copia el enlace webhook generado y configúralo en el plugin WP Webhooks.
Integración con Google Sheets:
- Añade nodos para interactuar con las Hojas de cálculo de Google.
- Configura nodos para añadir, encontrar y actualizar filas en tu hoja de cálculo.

Configuración del iterador:
- Implementa un iterador para procesar datos de forma eficiente.
- Conecta nodos para iterar a través de los datos sin problemas.
Hojas de cálculo de Google: Actualizar celda x4
En esta fase del flujo de trabajo, rellenamos las celdas de la hoja de cálculo con el nombre, el correo electrónico y el comentario del usuario, al tiempo que actualizamos el estado de "vacío" a "actualizado". Para conseguirlo, se necesitan cuatro nodos de actualización de celdas.
Añadir Nodos de Celda de Actualización:
- Haz clic en "añadir nodo" y selecciona el nodo "Actualizar celda" en las opciones de Google Sheets.
- Asegúrate de que tu token de autorización está insertado y elige la ruta de la hoja de cálculo.
Duplicación de nodos:
- Como las acciones de los cuatro nodos son idénticas, puedes ahorrar tiempo duplicando un nodo.
- Haz clic con el botón derecho en el nodo, selecciona "copiar" y pégalo en la ubicación deseada.
Renombrar nodos:
- Para evitar confusiones, cambia el nombre de cada nodo para distinguirlos entre sí.
Configuración de celdas y valores:
- Configura cada nodo para actualizar las celdas respectivas con los valores adecuados
Nombre:
- Celda: A (objeto googlesheetnumber del Iterador)
- Valor: objeto comment_author del activador webhook
Correo electrónico:
- Celda: B (objeto googlesheetnumber del Iterador)
- Valor: objeto comment_author_email del activador webhook
Comenta:
- Celda: C (objeto googlesheetnumber del Iterador)
- Valor: objeto comment_content del activador webhook
Estado:
- Celda: D (objeto googlesheetnumber del Iterador)
- Valor: actualizado
Conectar Nodos:
- Conecta los cuatro nodos al punto superior del Iterador para la ejecución secuencial.
Guarda los cambios:
- Una vez configurados, asegúrate de guardar los cambios realizados en los nodos.
Configurar la petición HTTP a los webhooks de WP Configuración::
El último paso de nuestro flujo de trabajo consiste en añadir un nodo de solicitud HTTP para gestionar acciones como la eliminación de comentarios. He aquí cómo configurarlo:
Añadir nodo de petición HTTP:
- Añade un nodo al punto de conexión derecho del iterador.
- Busca "Solicitud HTTP" en la lista de aplicaciones.
Configurar la petición HTTP:
- Obtén la URL de la acción Webhook de la pestaña Recibir datos del plugin webhook de wordpress.
- Accede a las acciones webhook wordpress y localiza la acción "Eliminar comentario".
- Modifica la URL añadiendo "&action=borrar_comentario" y "&comment_id={objeto_comentario}" para realizar la acción de borrado.

Método de configuración y guardar cambios:
- En el nodo de petición HTTP, establece el método como GET.
- Guarda los cambios para aplicar la configuración.
Configurar el filtro:
- Para evitar que se borren todos los comentarios, hay que establecer un filtro.
- Haz clic en la conexión entre el Iterador y la petición HTTP, y selecciona "configurar filtro".
Configuración del filtro:
- Introduce un nombre para el filtro en el campo "Etiqueta".
- En el campo "condición", utiliza la función "contiene" de la ventana Operadores.
- Después del primer hueco, inserta el objeto comment_id del activador webhooks wordpress.
- Después del punto y coma, inserta "https://" para asegurarte de que sólo se eliminan los comentarios que contienen enlaces.
Pruebas y conclusión
- Prueba el flujo de trabajo de automatización activando eventos relevantes en tu sitio de WordPress
- En el caso del comentario sin enlace, el nodo HTTP no estaba activado, mira:.

- Y el del comentario:

Siguiendo estos pasos, puedes crear un potente sistema de automatización para tu sitio web WordPress utilizando el plugin WP Webhooks pro y Latenode. Agiliza tus flujos de trabajo, mejora la participación de los usuarios y simplifica la gestión de contenidos con facilidad gracias a la perfecta integración de webhooks en WordPress.
Para obtener una plantilla lista para usar de este escenario, puedes acceder a ella aquí. Además, no dudes en unirte a nuestra comunidad de DiscordLatenode para obtener más ayuda y debatir sobre estrategias de automatización.
¡Feliz automatización!
Categorías
AI
TI y desarrollo


